
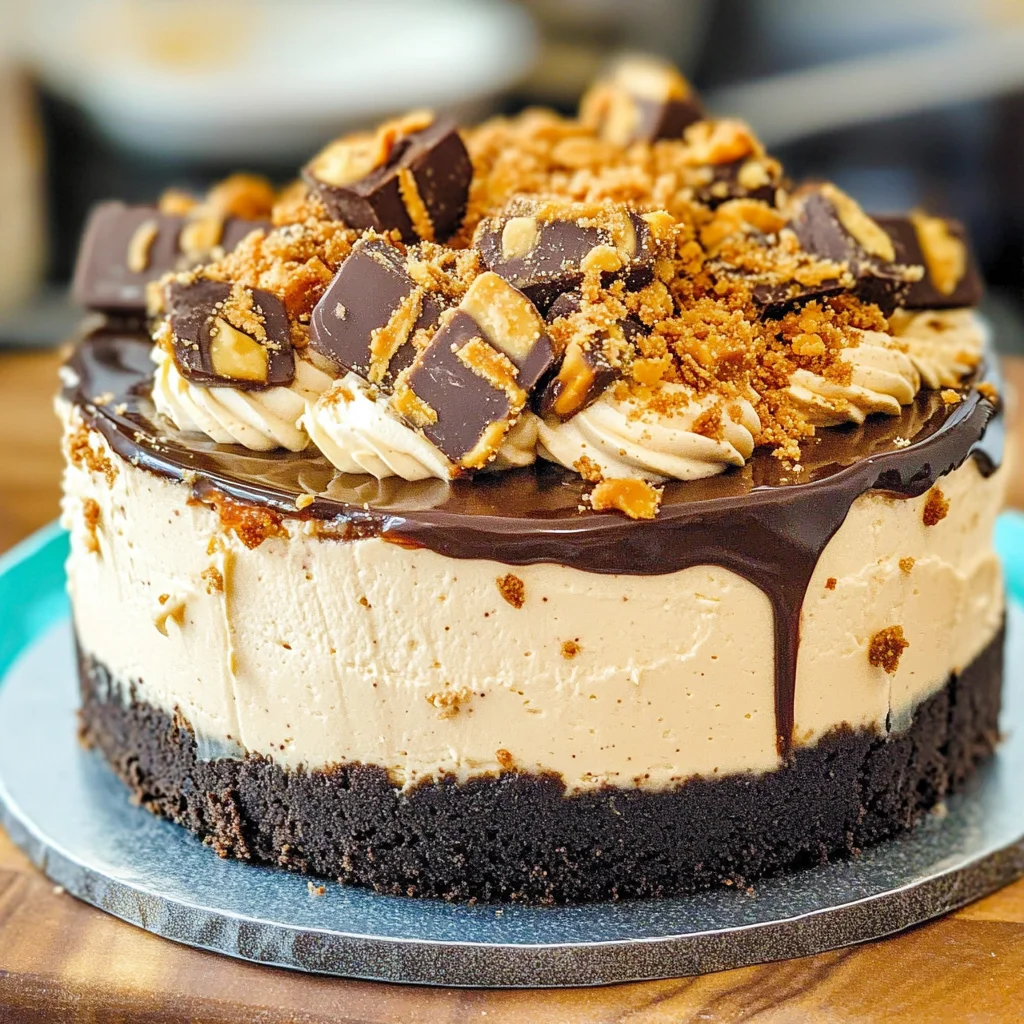
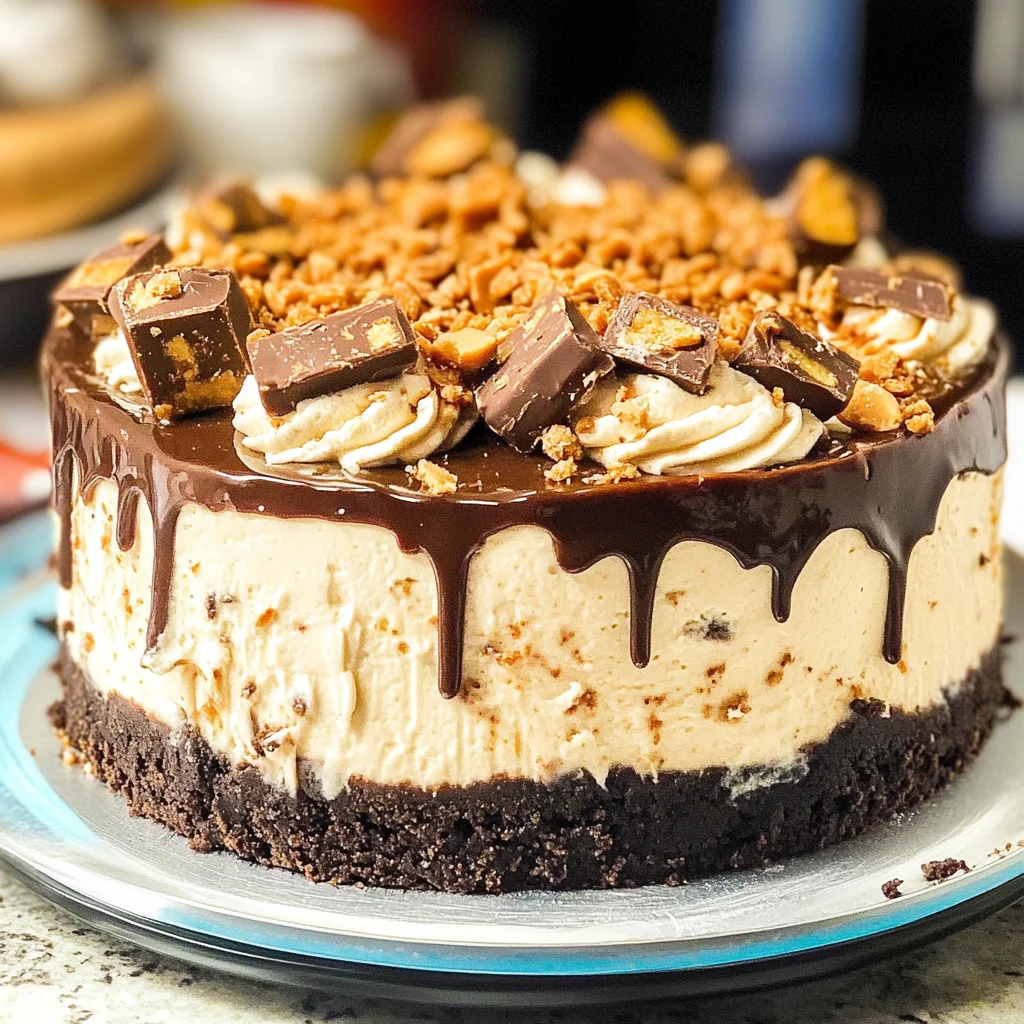
This Butterfinger Cheesecake is a delightful dessert that combines rich peanut butter cheesecake with the beloved crunch of Butterfingers, all nestled in a chocolate Oreo crust. Perfect for birthdays, holidays, or any celebration, this cheesecake is sure to impress your guests with its creamy texture and decadent flavors.
Why You’ll Love This Recipe
- Irresistible Flavor – The combination of peanut butter and Butterfingers creates a sweet treat that everyone will adore.
- Easy to Make – With straightforward steps, even novice bakers can achieve delicious results.
- Customizable – You can adjust the toppings or incorporate other candies for a unique twist.
- Visually Stunning – Topped with layers of chocolate ganache and whipped cream, this cheesecake is a feast for the eyes as well as the taste buds.
- Perfect for Any Occasion – Whether it’s a casual gathering or a formal event, this dessert fits right in.
Tools and Preparation
Gathering the right tools makes baking easier and more enjoyable. Here’s what you’ll need to create your Butterfinger Cheesecake:
Essential Tools and Equipment
- Springform pan
- Mixing bowls
- Electric mixer
- Rubber spatula
- Measuring cups and spoons
- Whisk
Importance of Each Tool
- Springform pan – Allows easy removal of the cheesecake without damaging its shape.
- Electric mixer – Makes blending ingredients quick and efficient, ensuring a smooth batter.
- Rubber spatula – Perfect for scraping down the sides of bowls and folding in ingredients gently.
Ingredients
For the Crust
- 2 1/4 cups (302g) Oreo crumbs
- 4 tbsp (56g) salted butter, melted
For the Cheesecake Filling
- 24 ounces (678g) cream cheese, room temperature
- 1 cup (207g) sugar
- 3 tbsp (24g) all purpose flour
- 3/4 cup (173g) sour cream, room temperature
- 1/2 cup (140g) peanut butter
- 1 tsp vanilla extract
- 4 large eggs, room temperature
- 1 1/2 cups (12 fun sized bars) chopped Butterfingers
For the Topping
- 6 oz semi-sweet chocolate chips
- 1/2 cup heavy whipping cream
- 3/4 cup heavy whipping cream
- 1/2 cup (58g) powdered sugar
- 2 tbsp (35g) peanut butter
- 1/4 tsp vanilla extract
- Chopped Butterfingers
How to Make Butterfinger Cheesecake
Step 1: Prepare the Crust
- Preheat your oven to 350°F (175°C).
- In a mixing bowl, combine the Oreo crumbs and melted butter until well mixed.
- Press the mixture firmly into the bottom of a springform pan to form an even layer.
- Bake for 10 minutes. Remove from the oven and let it cool.
Step 2: Make the Cheesecake Filling
- In a large mixing bowl, beat together cream cheese and sugar using an electric mixer until smooth.
- Add flour, sour cream, peanut butter, and vanilla extract. Mix until fully combined.
- Add eggs one at a time, mixing on low speed after each addition just until incorporated.
- Gently fold in chopped Butterfingers with a rubber spatula.
Step 3: Bake the Cheesecake
- Pour the cheesecake filling over the cooled crust in the springform pan.
- Bake for about 60-70 minutes or until edges are set but center is slightly jiggly.
- Turn off the oven and let it cool inside with the door ajar for about an hour.
Step 4: Prepare Toppings
- In a small saucepan over low heat, combine chocolate chips and heavy whipping cream until melted and smooth to create ganache.
- Allow ganache to cool slightly before pouring it over cooled cheesecake.
Step 5: Finish with Whipped Cream
- In another bowl, whip together heavy whipping cream, powdered sugar, peanut butter, and vanilla extract until stiff peaks form.
- Spread whipped cream over ganache layer on cheesecake.
- Top with additional chopped Butterfingers for garnish.
Step 6: Chill and Serve
- Refrigerate cheesecake for at least four hours or overnight before serving to allow it to set properly.
- Once chilled, carefully remove from springform pan and slice into pieces.
Enjoy your homemade Butterfinger Cheesecake! It’s sure to be a hit at any gathering!
How to Serve Butterfinger Cheesecake
Serving Butterfinger Cheesecake can elevate any gathering or celebration. This decadent dessert pairs wonderfully with various accompaniments to enhance its rich flavors.
With Fresh Fruit
- Berries: Strawberries, raspberries, or blueberries add a fresh contrast to the creamy cheesecake.
- Banana Slices: Sweet bananas complement the peanut butter and chocolate flavors beautifully.
With Whipped Cream
- Vanilla Whipped Cream: A simple dollop of whipped cream adds lightness and balances the richness of the cheesecake.
- Peanut Butter Whipped Cream: For peanut butter lovers, this whipped cream variation will intensify the flavor profile.
As a Layered Dessert
- Parfait Style: Layer pieces of Butterfinger Cheesecake with whipped cream and chopped Butterfingers in individual cups for a fun presentation.
- Mini Cheesecake Cups: Serve in small cups for an easy-to-eat option at parties.
With Coffee or Tea
- Coffee: A cup of rich coffee enhances the dessert experience and contrasts with the sweetness.
- Chai Tea: The spices in chai tea provide a unique flavor pairing with the cheesecake.
How to Perfect Butterfinger Cheesecake
Creating the perfect Butterfinger Cheesecake requires attention to detail. Here are some essential tips to ensure your cheesecake turns out delightful.
- Use Room Temperature Ingredients: Ensuring your cream cheese, sour cream, and eggs are at room temperature helps create a smooth batter without lumps.
- Do Not Overmix: Mix just until combined to avoid incorporating too much air, which can cause cracks during baking.
- Bake in a Water Bath: A water bath helps maintain even heat distribution, reducing cracking chances and providing a creamy texture.
- Cool Gradually: Allow your cheesecake to cool slowly in the oven after baking. This prevents sudden temperature changes that could lead to cracks.
- Chill Thoroughly: Refrigerate for at least 4-6 hours before serving for the best texture and flavor development.
- Garnish Creatively: Top with extra chopped Butterfingers and drizzle chocolate ganache for an eye-catching presentation.
Best Side Dishes for Butterfinger Cheesecake
Pairing your Butterfinger Cheesecake with complementary side dishes can enhance your dessert experience. Here are some great suggestions:
- Vanilla Ice Cream: A classic pairing that adds creaminess and balances sweetness.
- Chocolate Sauce: Drizzle over each slice for extra decadence and a rich flavor boost.
- Caramel Sauce: A sweet caramel drizzle provides a contrasting flavor that works well with chocolate and peanut butter.
- Fruit Salad: A light fruit salad offers freshness and cuts through the richness of the cheesecake.
- Nutty Granola: Sprinkle on top for added crunch and texture that contrasts nicely with the creamy filling.
- Chocolate-Covered Pretzels: These salty-sweet snacks can serve as a delicious crunchy sidekick to your cheesecake.
Common Mistakes to Avoid
It’s easy to make mistakes when baking a Butterfinger Cheesecake. Here are some common pitfalls and how to steer clear of them.
- Ignoring room temperature ingredients: Using cold cream cheese or eggs can lead to lumps in your cheesecake. Always bring these ingredients to room temperature for a smooth batter.
- Overmixing the batter: Mixing too much can introduce air, causing the cheesecake to crack while baking. Mix just until combined and avoid excessive beating.
- Skipping the water bath: A water bath helps maintain moisture in the oven, preventing cracking. Always use this method for a perfect Butterfinger Cheesecake.
- Not chilling long enough: Cheesecakes need time to set properly. Allow it to chill in the refrigerator for at least 4 hours or overnight for best results.
- Cutting with a warm knife: Using a warm knife will create messy slices. Dip your knife in hot water and wipe it clean between cuts for neat slices.
Storage & Reheating Instructions
Refrigerator Storage
- Store the Butterfinger Cheesecake in an airtight container.
- It will stay fresh in the refrigerator for up to 5 days.
- If possible, place parchment paper between slices to prevent sticking.
Freezing Butterfinger Cheesecake
- Wrap individual slices tightly in plastic wrap, then place them in a freezer-safe container.
- The cheesecake can be frozen for up to 3 months.
- Thaw in the refrigerator overnight before serving.
Reheating Butterfinger Cheesecake
- Oven: Preheat your oven to 350°F (175°C). Place the cheesecake on a baking sheet and warm it for about 10-15 minutes.
- Microwave: Heat individual slices on medium power for about 20-30 seconds, checking frequently.
- Stovetop: Place slices in a pan over low heat, cover with a lid, and warm gently until heated through.
Frequently Asked Questions
What is Butterfinger Cheesecake?
Butterfinger Cheesecake is a creamy dessert made with peanut butter, cream cheese, and chopped Butterfingers, all resting on a chocolate Oreo crust.
How do I make my Butterfinger Cheesecake richer?
To enhance richness, consider adding more cream cheese or using full-fat sour cream instead of low-fat versions.
Can I customize my Butterfinger Cheesecake?
Absolutely! You can add other candies like Snickers or Twix or swap out peanut butter for almond butter for different flavors.
How long does it take to bake Butterfinger Cheesecake?
Typically, it takes about 60-70 minutes at 325°F (163°C) but remember that cooling time is also essential.
Is there an alternative to whipped cream topping?
Yes! You can use coconut whipped cream or dairy-free topping as an alternative if you prefer non-dairy options.
Final Thoughts
This Butterfinger Cheesecake is not only indulgent but also versatile enough for any occasion. Its rich flavor and delightful texture make it a crowd-pleaser. Feel free to experiment with toppings or mix-ins that suit your taste!
Butterfinger Cheesecake
- Total Time: 1 hour 40 minutes
- Yield: Serves approximately 12 slices 1x
Description
Indulge in this creamy Butterfinger Cheesecake, a delightful dessert that marries smooth peanut butter cheesecake with the irresistible crunch of Butterfingers, all placed on a rich chocolate Oreo crust. This decadent cheesecake is perfect for birthdays, holidays, or any gathering where you want to impress your guests. Topped with velvety chocolate ganache and light whipped cream, each slice is a visual and culinary treat that will leave everyone wanting more. Whether you’re a novice baker or an experienced chef, this easy-to-follow recipe will help you create a show-stopping dessert that’s sure to be the star of the table.
Ingredients
- 2 1/4 cups Oreo crumbs
- 4 tbsp salted butter, melted
- 24 ounces cream cheese, room temperature
- 1 cup sugar
- 3 tbsp all-purpose flour
- 3/4 cup sour cream, room temperature
- 1/2 cup peanut butter
- 1 tsp vanilla extract
- 4 large eggs, room temperature
- 1 1/2 cups chopped Butterfingers
- 6 oz semi-sweet chocolate chips
- 1/2 cup heavy whipping cream
- 3/4 cup heavy whipping cream
- 1/2 cup powdered sugar
- 2 tbsp peanut butter
- 1/4 tsp vanilla extract
- Chopped Butterfingers for garnish
Instructions
- Preheat oven to 350°F (175°C). Mix Oreo crumbs with melted butter and press into a springform pan. Bake for 10 minutes.
- In a bowl, beat cream cheese and sugar until smooth. Add flour, sour cream, peanut butter, and vanilla; mix well. Incorporate eggs one at a time and fold in chopped Butterfingers.
- Pour filling over crust and bake for 60-70 minutes until edges are set. Cool in the oven with the door ajar.
- Melt chocolate chips with heavy cream to create ganache; pour over cooled cheesecake.
- Whip heavy cream with powdered sugar and peanut butter; spread over ganache and garnish with additional Butterfingers.
- Chill for at least four hours before serving.
- Prep Time: 30 minutes
- Cook Time: 70 minutes
- Category: Dessert
- Method: Baking
- Cuisine: American
Nutrition
- Serving Size: 1 slice (approximately 120g)
- Calories: 395
- Sugar: 26g
- Sodium: 309mg
- Fat: 28g
- Saturated Fat: 14g
- Unsaturated Fat: 12g
- Trans Fat: 0g
- Carbohydrates: 34g
- Fiber: 2g
- Protein: 6g
- Cholesterol: 90mg